

Introduction
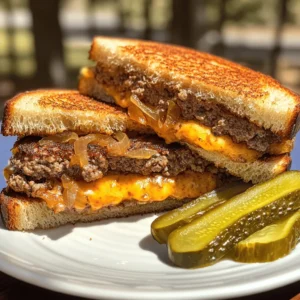
The patty melt is a quintessential American comfort food that has stood the test of time, weaving its way through the fabric of diner culture and home kitchens alike. This delightful sandwich combines juicy, seasoned beef patties with gooey, melty cheese and sweet, caramelized onions, all sandwiched between crispy, toasted rye bread. The result is a harmonious blend of flavors and textures that offers a satisfying bite with every mouthful.
What makes the classic patty melt so appealing is not just its rich flavors, but also its quick preparation. It’s a recipe that can be whipped up in a matter of minutes, making it an ideal choice for busy weeknights or casual get-togethers. The nostalgic comfort it brings, reminiscent of classic diners and burger joints, adds to its allure. For anyone looking for a hearty meal that evokes feelings of warmth and satisfaction, the patty melt is a perfect choice.
The Allure of the Patty Melt
To truly appreciate the patty melt, it’s important to understand its historical background. The origins of this beloved sandwich can be traced back to the mid-20th century when it emerged as a popular item in diners across America. While the exact genesis remains somewhat murky, it is widely believed that the patty melt was inspired by the classic cheeseburger, merging the best elements of both worlds: the beef patty and the grilled cheese sandwich.
The evolution of the patty melt has seen it secure a cherished spot in American cuisine. As diners proliferated in the post-war era, the patty melt became a go-to choice for patrons seeking comfort food that was both filling and flavorful. It has since become synonymous with late-night cravings and casual dining, often enjoyed alongside a side of crispy fries or a refreshing milkshake.
When comparing the patty melt to other classic sandwiches, it stands out for its unique combination of ingredients. While a cheeseburger is typically served on a soft bun and may feature a variety of toppings, the patty melt’s focus on caramelized onions and the choice of rye bread creates a distinctive flavor profile. The toasty crust of the rye complements the savory beef and cheese, while the caramelized onions add a subtle sweetness that elevates the entire experience.
It’s this combination that has allowed the patty melt to maintain its status as a beloved staple, appealing to generations of food lovers who appreciate a good sandwich.
Ingredients Breakdown
To create the perfect classic patty melt, you’ll need a selection of essential ingredients that each play a vital role in achieving the ultimate flavor and texture. Here’s a detailed breakdown of what you’ll need:
– Ground Beef: The foundation of any great patty melt is, of course, the beef. For the juiciest and most flavorful results, it’s recommended to use an 80/20 blend of ground beef. This means that 80% of the mixture is lean meat while 20% is fat, which is the sweet spot for retaining moisture during cooking. The fat content not only enhances the flavor but also helps the patties maintain their juiciness, resulting in a mouthwatering bite.
– Onions: Onions are indispensable in a classic patty melt. The key to enhancing their flavor is the caramelization process. When cooked slowly over low heat, onions transform from sharp and pungent to sweet and deeply flavorful. This process takes patience but is well worth the effort, as the caramelized onions provide a rich and savory contrast to the beef and cheese.
– Butter: Butter serves multiple purposes in this recipe. Not only is it used to cook the onions, imparting a rich flavor, but it’s also crucial for grilling the sandwich to perfection. Spreading butter on the outside of the rye bread ensures a beautiful golden-brown crust, adding both flavor and texture.
– Rye Bread: The choice of bread is critical in a patty melt, and rye bread is the traditional option that gives this sandwich its distinctive character. Rye has a slightly tangy flavor and a hearty texture that pairs beautifully with the beef and cheese. The robust nature of rye bread holds up well to the fillings, providing a satisfying crunch when toasted.
– Cheese Options: When it comes to cheese, there are a couple of classic choices. American cheese is often favored for its excellent melting properties and creamy texture, while Swiss cheese offers a nuttier flavor and a delightful melt. Both options work well, but the choice ultimately depends on personal preference. You could even experiment with a blend of both for a unique twist.
– Worcestershire Sauce: This condiment might seem like a small addition, but it packs a punch in terms of flavor. A splash of Worcestershire sauce adds depth and umami to the beef, enhancing its savory qualities. Just a teaspoon can elevate the overall taste of the patties, making them even more irresistible.
– Seasonings: To bring out the best in every ingredient, seasoning is key. A simple combination of salt and pepper is often all you need to enhance the flavor of the beef. Make sure to season your patties generously, as this is what will provide the foundation for the overall taste of your patty melt.
Preparation Steps Explained
Now that you have a good understanding of the ingredients that make up the classic patty melt, it’s time to dive into the preparation steps. Following a simple, straightforward process will ensure that your patty melt turns out perfectly every time.
1. Caramelize the Onions: Begin by thinly slicing your onions. In a skillet over medium heat, melt a tablespoon of butter. Add the onions and a pinch of salt, stirring occasionally to prevent burning. Allow the onions to cook slowly until they turn golden brown and caramelized, approximately 15-20 minutes. This step is crucial, as the sweetness of the caramelized onions is one of the standout features of the patty melt.
2. Prepare the Beef Patties: While the onions are caramelizing, you can prepare your beef patties. In a bowl, combine the ground beef with Worcestershire sauce, salt, and pepper. Gently mix the ingredients, being careful not to overwork the meat, which can lead to tough patties. Divide the mixture into equal portions and shape them into patties that are slightly larger than the bread, as they will shrink during cooking.
3. Cook the Patties: In the same skillet used for the onions, increase the heat to medium-high and add a little more butter if necessary. Once the skillet is hot, place the patties in the pan. Cook for about 4-5 minutes on one side before flipping, adding cheese to the top of each patty once flipped. Cover the skillet with a lid to help the cheese melt evenly. Cook for an additional 3-4 minutes, or until the patties reach your desired level of doneness.
4. Assemble the Sandwich: Once the patties are cooked and the cheese is melted, it’s time to assemble your patty melt. Take two slices of rye bread and spread butter on one side of each slice. Place one slice, buttered side down, in a clean skillet. Layer the cooked patty with melted cheese on top, followed by a generous helping of caramelized onions. Finally, add the second slice of rye bread, buttered side up.
5. Grill to Perfection: Cook the assembled sandwich on medium heat for about 3-4 minutes, or until the bottom is golden brown. Carefully flip the sandwich and grill the other side for an additional 3-4 minutes. If the cheese hasn’t fully melted yet, you can cover the skillet for a minute to trap heat and ensure a gooey filling.
This step-by-step guide sets the stage for crafting a classic patty melt that is not only delicious but also evokes a sense of nostalgia with each bite. Stay tuned for the next part of this article, where we will delve deeper into tips for achieving the best results and answer some common questions about this beloved sandwich.

Cooking the Onions: Techniques for Perfect Caramelization and Flavor Development
Caramelizing onions is a crucial step in creating a delectable patty melt that boasts deep, savory flavors. To achieve perfect caramelization, start with high-quality yellow or sweet onions, which naturally offer a sweeter taste when cooked.
1. Slicing the Onions: Begin by slicing your onions thinly—this increases their surface area and allows for even cooking. Aim for about 1/4-inch thickness.
2. Heat the Pan: Use a large skillet or sauté pan and heat it over medium-low heat. Adding a touch of olive oil or butter creates a rich flavor base. About 1-2 tablespoons should suffice.
3. Cooking Process: Add the sliced onions to the pan, stirring occasionally. The key to caramelization is patience; allow the onions to cook slowly. After about 10 minutes, sprinkle a pinch of salt to help draw out moisture, and keep cooking for an additional 20-30 minutes. You’ll know they are done when they turn a rich golden-brown color and are soft and sweet to taste.
4. Flavor Enhancements: For an extra depth of flavor, consider adding a splash of balsamic vinegar or a teaspoon of sugar in the last few minutes of cooking. This will enhance the sweetness and add a tangy finish to your onions.
Preparing the Patties: Tips for Mixing and Shaping to Maintain Juiciness
Creating the perfect burger patty is an art form, and it starts with selecting the right meat. Choose ground beef with a fat content of around 80/20 for optimal juiciness and flavor.
1. Mixing the Ingredients: In a large bowl, gently combine the ground beef with salt, pepper, and any other desired seasonings (like garlic powder or onion powder). Avoid over-mixing, as this can lead to tough patties.
2. Shaping the Patties: Once mixed, divide the meat into equal portions (typically about 4-6 ounces per patty). Use your hands to gently form each portion into a patty, making a slight indentation in the center. This helps the patty cook evenly and prevents puffing during cooking.
3. Refrigeration: For best results, place the shaped patties on a plate and refrigerate them for at least 30 minutes before cooking. This helps them hold their shape and enhances the texture.
Cooking the Patties: Optimal Cooking Methods to Achieve Desired Doneness and Cheese Melt
The way you cook your patties can significantly affect the final outcome of your patty melt.
1. Cooking Options: You can grill, pan-fry, or broil your patties. For this recipe, pan-frying is ideal, as it allows for a flavorful crust to form.
2. Heating the Skillet: Preheat a skillet over medium-high heat and add a small amount of oil to prevent sticking. When hot, add the patties.
3. Cooking Time: Cook the patties for about 3-4 minutes on one side, then flip. At this point, place a slice of cheese on top of each patty to melt while the other side cooks. Continue cooking for another 3-4 minutes for medium doneness.
4. Check for Doneness: Use a meat thermometer to ensure the internal temperature reaches at least 160°F for ground beef. If you prefer a cheesier melt, cover the skillet with a lid for the last minute of cooking to trap steam.
Assembling the Patty Melt: Step-by-Step Guidance for Layering Ingredients for Maximum Flavor
Assembling your patty melt requires attention to detail to ensure each bite is packed with flavor.
1. Bread Choice: Start with slices of rye bread, which provide a robust flavor that complements the richness of the beef and cheese.
2. Layering: Begin with a slice of bread, add a generous layer of the caramelized onions, followed by the cooked patty with melted cheese. Top with another layer of caramelized onions and finish with a second slice of rye bread.
3. Pressing Together: Gently press the sandwich down to help the layers meld together, ensuring every bite has the perfect balance of meat, cheese, and onion.
Grilling the Sandwich: Techniques for Achieving the Ideal Crispiness and Golden Color on Rye Bread
Grilling your patty melt is the final step to achieving a satisfying crunch and toasting your bread to perfection.
1. Butter the Bread: Spread softened butter on the outer sides of both slices of bread. This not only enhances flavor but also promotes even browning.
2. Grilling Process: Heat a clean skillet or griddle over medium heat. Place the assembled sandwich in the skillet and cook for about 3-4 minutes until golden brown.
3. Flipping: Carefully flip the sandwich using a spatula. If desired, you can place a heavy skillet on top to press the sandwich down, enhancing the crispiness. Cook for an additional 3-4 minutes on the other side.
4. Serving: Once both sides are golden brown and crispy, remove the sandwich from the heat and let it rest for a minute before slicing in half. This allows the cheese to set slightly, making for a cleaner cut.
Flavor Enhancements and Variations
The classic patty melt can be easily customized to suit your taste preferences.
1. Ingredient Variations: Experiment with different cheeses such as aged cheddar, Swiss, or pepper jack for added spice. For the bread, consider using sourdough or even a brioche bun for a sweeter twist.
2. Condiment Options: Traditional choices include mustard and ketchup, but don’t shy away from creative options like a tangy remoulade, spicy aioli, or even a smoky barbecue sauce for a unique flavor profile.
3. Regional Variations: Across the U.S., different regions have their takes on the patty melt. For instance, in Texas, you might find them topped with jalapeños or served with queso, while in New York, a classic diner version may include sauerkraut.
Serving Suggestions
The presentation and side dishes can elevate your patty melt experience.
1. Ideal Accompaniments: Serve your patty melt with crispy French fries, creamy coleslaw, or dill pickles for a refreshing crunch. A side salad can also provide balance to the richness of the sandwich.
2. Presentation Tips: Serve the patty melt on a rustic wooden board or a simple white plate. Consider placing your fries in a small metal basket for a diner-style experience. Garnish with fresh parsley or a pickle spear on the side for that finishing touch.
Nutritional Information
Understanding the nutritional breakdown can help you make informed choices.
1. Calories and Macronutrients: A typical patty melt contains approximately 600-800 calories per serving, depending on the size of the patty and the amount of cheese used. A basic breakdown includes around 40g of protein, 40g of carbohydrates, and 35g of fat.
2. Dietary Considerations: For those with gluten sensitivities, consider using gluten-free bread or lettuce wraps as an alternative. If you are looking for a lower-carb option, use a portobello mushroom cap instead of bread.
Conclusion
The classic patty melt is a culinary delight that perfectly combines comfort, flavor, and simplicity. With its juicy beef patty, caramelized onions, and melted cheese layered between crispy rye bread, this dish is sure to please everyone at your table.
We encourage you to try making this recipe at home and experience the joy of cooking and sharing a delicious meal with family and friends. With a few simple techniques and the right ingredients, you can create a patty melt that rivals those at your favorite diner. So roll up your sleeves, gather your loved ones, and indulge in this timeless classic!