

Indulging in desserts that combine classic flavors is an irresistible treat for many. Among the most delightful desserts, Cookie Dough Oreo Brownies stand out, merging the rich, fudgy goodness of brownies with the nostalgic taste of cookie dough and the crunch of Oreo cookies. This dessert not only tantalizes the taste buds but also satisfies the soul, making it a favorite for gatherings, celebrations, or simply a cozy night at home. In this article, we will guide you through creating this decadent dessert, sharing insights into its ingredients, preparation steps, and the joy it brings to any occasion.
Understanding the Allure of Cookie Dough Oreo Brownies
Exploring the Popularity of Brownies and Cookie Dough Desserts
Brownies have long been a staple in the dessert world, loved for their dense, chewy texture and rich flavor. Originating in the United States in the late 19th century, brownies have evolved from a simple chocolate treat to a versatile dessert canvas. The addition of cookie dough elevates the experience even further. Cookie dough desserts have surged in popularity, capturing the hearts of dessert lovers who crave the nostalgic taste of raw cookie dough without the health risks associated with consuming raw eggs. The combination of these two beloved treats creates a harmonious blend of textures and flavors that is truly irresistible.
The Fusion of Flavors: Why Oreo Cookies Elevate the Experience
Oreo cookies, with their signature crunchy chocolate wafers and creamy filling, add a unique twist to the traditional brownie. The contrast between the fudgy brownie base and the crispy Oreo pieces creates a delightful textural experience. Furthermore, the rich chocolate flavor of Oreos complements the sweetness of the brownie and the cookie dough, enhancing the overall taste profile of the dessert. This fusion not only satisfies chocolate cravings but also provides a satisfying crunch that keeps you coming back for more.
The Appeal of Homemade Desserts in a World of Pre-Packaged Options
In today’s fast-paced world, pre-packaged desserts are often seen as convenient, but they can’t compare to the satisfaction of homemade treats. Baking at home allows you to control the ingredients, ensuring that your dessert is made with love and care. Moreover, the aroma of freshly baked brownies wafting through your kitchen is an experience that store-bought desserts simply cannot replicate. Homemade Cookie Dough Oreo Brownies are not only a treat for your taste buds but also a way to create lasting memories with family and friends. The joy of sharing something you made from scratch adds an extra layer of warmth to any occasion.
Ingredients Overview
Before diving into the preparation process, let’s take a closer look at the key ingredients that make Cookie Dough Oreo Brownies a standout dessert.
Brownie Mix: Choosing the Right Box
The foundation of our dessert is the brownie mix. While some bakers prefer to make brownies from scratch, using a high-quality boxed brownie mix can save time without sacrificing flavor. When selecting a brownie mix, look for one that has a reputation for producing fudgy, moist brownies. Brands that use rich cocoa and have minimal artificial ingredients are usually the best choices. Always check the instructions on the box to ensure you have the correct additional ingredients on hand.
Oreo Cookies: The Crunch Factor
Oreo cookies are the star of this dessert, adding a delightful crunch and a burst of chocolatey flavor. You can use regular Oreos or get creative with different flavors like Double Stuf or even seasonal varieties. Crushing the cookies before adding them to the mix allows their flavor to permeate the brownies, ensuring every bite is packed with that classic Oreo taste.
Understanding the Role of Unsalted Butter in Baking
Unsalted butter is a key ingredient in both the brownie and cookie dough components of this recipe. It not only adds richness and flavor but also contributes to the overall texture of the brownies. Using unsalted butter allows you to control the amount of salt in your recipe, ensuring a balanced flavor profile. When incorporating butter into your brownie mix, it’s best to use it at room temperature for easier mixing.
Exploring the Significance of Sugars in Texture and Flavor
Sugar plays a pivotal role in baking, affecting both the flavor and texture of your brownies. In this recipe, granulated sugar and brown sugar are used to create a chewy texture and rich flavor. While granulated sugar helps to create a nice crust on the brownies, brown sugar adds moisture and a hint of caramel flavor. The combination of these sugars ensures that your brownies are sweet without being overly cloying.
The Importance of Flour for Structure
Flour is essential for providing structure to baked goods. In this recipe, all-purpose flour is used in the cookie dough portion to give it the right consistency. It helps to create a chewy texture while also ensuring that the dough holds together when baked. Be sure to measure your flour accurately; too much can lead to dry cookies, while too little can result in a crumbly mess.
How Milk and Vanilla Enhance the Taste
Milk and vanilla extract are often considered the unsung heroes of baking. Milk adds moisture to both the brownie and cookie dough, preventing dryness, and contributes to a tender crumb. Vanilla extract enhances the overall flavor, providing a warm, aromatic quality that elevates the dessert. Using pure vanilla extract is recommended for the best flavor, as imitation vanilla can lack the depth that real vanilla provides.
The Role of Salt in Balancing Sweetness
Salt is a crucial ingredient in baking, and its role should not be overlooked. While it may seem counterintuitive, a pinch of salt can actually enhance the sweetness of desserts by balancing flavors. In Cookie Dough Oreo Brownies, a small amount of salt is added to both the brownie mix and the cookie dough, ensuring a well-rounded taste that prevents the dessert from becoming overly sweet.
Mini Chocolate Chips: A Delightful Addition
To elevate the chocolatey goodness of the brownies, mini chocolate chips are included in the cookie dough. These little bursts of chocolate provide an extra layer of flavor and texture, making every bite even more indulgent. Opting for mini chips ensures that they melt evenly throughout the cookie dough, creating a deliciously gooey experience.
Preparation Process
Now that you have a solid understanding of the ingredients, it’s time to dive into the preparation process. Making Cookie Dough Oreo Brownies is a straightforward endeavor that can be broken down into clear steps.
Creating the Brownie Base
Step 1: Preheat the Oven
Before getting started, preheat your oven to the temperature specified on your brownie mix package, usually around 350°F (175°C). Preheating the oven ensures that your brownies bake evenly and achieve the desired fudgy texture.
Step 2: Prepare Your Baking Dish
Next, prepare your baking dish by greasing it lightly with non-stick cooking spray or lining it with parchment paper. Using parchment paper can help you easily lift the brownies out of the pan once they are cooled, making for a cleaner cut and presentation.
Step 3: Mix the Brownie Batter
In a large mixing bowl, combine the brownie mix with the required ingredients listed on the package, typically including eggs, oil, and water. Whisk the mixture until it is just combined, taking care not to overmix, as this can lead to tougher brownies. The batter should be smooth and glossy, with no dry patches remaining.
Step 4: Pour the Brownie Batter into the Baking Dish
Once your brownie batter is ready, pour it into the prepared baking dish. Use a spatula to spread the batter evenly across the bottom, ensuring that it reaches the corners of the dish. This will create a uniform brownie base that bakes evenly.
Step 5: Add Crushed Oreo Cookies
Before baking the brownies, sprinkle a generous layer of crushed Oreo cookies on top of the brownie batter. The Oreo pieces will sink slightly during baking, infusing the brownies with their delicious flavor while maintaining a delightful crunch.
With the brownie base ready, we will move on to preparing the cookie dough in the next section. Stay tuned for the step-by-step process that will guide you through creating the delicious cookie dough that will top off these indulgent brownies.

Techniques for Folding in Crushed Oreos for Even Distribution
When it comes to achieving the perfect Cookie Dough Oreo Brownies, the technique of folding in the crushed Oreos is crucial. Proper folding ensures that the Oreos are evenly distributed throughout the batter, allowing every bite to be infused with that signature Oreo flavor. Here are some effective techniques to achieve this:
1. Use a Large Bowl: Start by placing your brownie batter in a large mixing bowl. This will give you enough space to gently incorporate the crushed Oreos without splattering or overmixing the batter.
2. Gentle Folding: Using a rubber spatula, scoop under the batter and lift it over itself, turning the bowl as you go. This method is much gentler than stirring, which can deflate the air bubbles in your batter and result in denser brownies.
3. Add Oreos Gradually: Instead of dumping all the crushed Oreos at once, add them in two or three batches. This allows you to monitor their distribution more easily and ensures all pieces are well-integrated without overworking the batter.
4. Rotate and Lift: As you fold, rotate the bowl with your other hand while lifting the batter over the Oreos. This motion promotes even mixing while maintaining the fluffy texture of your brownie batter.
Making the Cookie Dough Layer
Creaming Techniques for Optimal Texture
Creating the cookie dough layer requires proper creaming techniques to achieve that rich, buttery texture. Here’s how to do it right:
1. Room Temperature Ingredients: Ensure your butter and eggs are at room temperature. This allows for better incorporation of air during the creaming process, resulting in a lighter cookie dough.
2. Mixing Order: Start by beating the butter until it’s light and fluffy. Gradually add in the sugars (both granulated and brown), mixing until well combined. The sugars contribute to the dough’s texture and flavor, creating a perfect balance of sweetness.
3. Duration: Cream the mixture for about 3-5 minutes. This time frame is essential for achieving a light and airy dough. The mixture should appear pale and fluffy before you add the eggs.
4. Incorporating Eggs: Add the eggs one at a time, mixing well after each addition. This step is vital as it ensures that the eggs are fully incorporated, which contributes to the dough’s overall structure.
Importance of Mixing Wet and Dry Ingredients Separately
To achieve the best results, always mix your wet and dry ingredients separately before combining them. Here’s why:
1. Even Distribution: Mixing wet ingredients (butter, sugars, eggs, and vanilla) separately allows for even distribution of moisture throughout the dry ingredients (flour, baking soda, and salt) when combined.
2. Prevent Clumping: By whisking the dry ingredients together first, you break up any clumps of flour or baking soda. This ensures a smooth, uniform mixture that won’t lead to uneven baking or texture.
3. Enhancing Flavor: Separately mixing allows dry ingredients to become well-blended with the leavening agents, ensuring a consistent rise during baking, which enhances the overall flavor profile of your cookie dough.
How to Incorporate Chocolate Chips Effectively
Incorporating chocolate chips into your cookie dough layer is the final touch that elevates your Cookie Dough Oreo Brownies. Here’s how to do it effectively:
1. Fold-in Technique: Once you’ve combined your wet and dry ingredients, gently fold in the chocolate chips using the same folding technique described previously. This ensures they are evenly distributed without overworking the dough.
2. Use Mini Chips: Opt for mini chocolate chips for a more even distribution throughout the cookie dough. They blend seamlessly into the dough, providing a delightful chocolate burst in every bite.
3. Chill for Better Texture: If your cookie dough seems too soft, consider chilling it for 30 minutes before layering it on the brownies. Chilling helps solidify the fats, making it easier to spread without the dough melting into the brownies.
Layering Techniques for Optimal Results
Spreading the Cookie Dough Over Brownies: Tips and Tricks
Layering the cookie dough perfectly over your brownie base is essential for a beautiful presentation and satisfying texture. Here are some techniques to help you succeed:
1. Use an Offset Spatula: This tool is perfect for spreading cookie dough evenly across the brownie layer. It allows for precision and helps smooth out the surface.
2. Dollop Method: Instead of trying to spread all the cookie dough at once, dollop spoonfuls of cookie dough over the brownie layer. This prevents the brownie from pulling up as you spread the cookie dough.
3. Even Pressure: When spreading the dough, apply even, gentle pressure to avoid tearing the brownie layer underneath. Take your time to ensure a smooth, even layer.
4. Texture Variation: For added visual appeal, leave some areas of the cookie dough slightly thicker than others. This creates a rustic look and adds texture to the final product.
Visual Appeal: How to Ensure a Beautiful Presentation with Toppings
Presentation can elevate your Cookie Dough Oreo Brownies from simple to stunning. Here are tips for making them visually appealing:
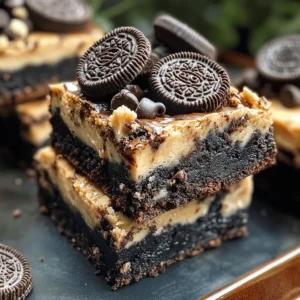
1. Crushed Oreos on Top: Before baking, sprinkle additional crushed Oreos over the cookie dough layer. This not only adds texture but also enhances the Oreo flavor and visual appeal.
2. Drizzle with Chocolate: Once cooled, drizzle melted chocolate over the top. This adds a glossy finish and an extra layer of sweetness.
3. Serve with Whipped Cream: For a restaurant-quality presentation, top each brownie square with a dollop of whipped cream or a scoop of ice cream when serving. This adds a delightful contrast in temperature and creaminess.
Baking the Cookie Dough Oreo Brownies
Understanding the Baking Process
Baking is both an art and a science, and understanding the process is vital for achieving perfect Cookie Dough Oreo Brownies:
1. Preheating: Why It Matters: Always preheat your oven to the specified temperature before placing your brownies inside. A properly preheated oven ensures even cooking and helps your brownies rise correctly.
2. Perfect Baking Times and Checking for Doneness: Bake your brownies for about 25-30 minutes, but start checking for doneness at around 25 minutes. Insert a toothpick into the center; it should come out with a few moist crumbs, not wet batter. This indicates that the brownies are perfectly baked.
3. The Science Behind Cooling and Cutting Brownies for the Best Texture: Allow your brownies to cool in the pan for at least 15-20 minutes before attempting to cut them. This cooling period helps the brownies set, making them easier to cut and preventing them from falling apart. For clean cuts, use a sharp knife and wipe it clean between slices.
Serving Suggestions
Ideas for serving these brownies can elevate your dessert experience:
1. Pairing with Ice Cream or a Glass of Milk: The rich flavors of the brownies pair perfectly with a scoop of vanilla ice cream or a tall glass of cold milk. The coldness of the ice cream complements the warm, gooey brownies, creating a delightful contrast.
2. Creative Presentation Ideas for Gatherings: For parties or gatherings, consider cutting the brownies into smaller squares and serving them on a platter with various toppings on the side—such as sprinkles, whipped cream, and additional crushed Oreos. Guests can customize their desserts!
3. Storing Leftovers for Freshness: If you find yourself with leftover brownies (though that’s unlikely!), store them in an airtight container at room temperature for up to 3 days. For longer storage, wrap them tightly in plastic wrap and freeze for up to 3 months. When ready to enjoy, let them thaw at room temperature.
Conclusion
Cookie Dough Oreo Brownies are more than just a dessert; they are a celebration of flavors and textures that bring joy to any gathering. With their rich, gooey brownie base, complemented by the sweetness of cookie dough and the crunch of Oreos, they are sure to delight both family and friends. This guide provides a comprehensive overview of how to create this indulgent treat, ensuring your baking adventure is both enjoyable and rewarding. Enjoy the satisfaction of creating a dessert that not only tastes amazing but also becomes a memorable part of your culinary repertoire.