
Introduction
As the leaves turn vibrant shades of orange and gold, and the air becomes crisp with the promise of autumn, there’s nothing quite as comforting as the flavors of this enchanting season. Among the many delightful treats that embody the spirit of fall, Pumpkin Oreo Balls stand out for their irresistible combination of rich pumpkin flavor, creamy filling, and the beloved crunch of Oreo cookies. These no-bake desserts are not only simple to prepare but also perfect for sharing with family and friends during gatherings, holiday parties, or as a sweet indulgence at home.
Pumpkin Oreo Balls are a fusion of two favorites: the iconic Oreo cookie and the warm, nostalgic flavors of pumpkin pie. The creamy, smooth filling is made with cream cheese mixed with pumpkin puree and a touch of spices, all enveloped in a crunchy Oreo coating. This recipe not only brings out the best of fall flavors but also offers the convenience of minimal preparation time, making it an ideal treat for busy hosts and bakers alike.
In this article, we will delve into the ingredients that make these Pumpkin Oreo Balls so delightful, providing you with step-by-step instructions to guide you through the preparation process. By the end of this guide, you will be equipped with all the knowledge needed to create these delectable bites that surely will be a hit at any occasion.
Understanding the Ingredients
To create the perfect Pumpkin Oreo Balls, it is essential to understand the role of each ingredient in achieving the ultimate flavor and texture. Here’s a closer look at the key components that come together in this mouthwatering recipe:
Oreo Cookies: A Versatile Base
Oreo cookies serve as the foundation of this delightful dessert, thanks to their unique flavor and texture. With their rich chocolatey exterior and creamy filling, Oreos provide both a satisfying crunch and a sweet contrast to the pumpkin filling. Their versatility allows them to be used in various dessert recipes, from cheesecake crusts to cake pops, making them a staple in many kitchens.
When crushed, Oreos transform into a crumbly mixture that can easily bind with other ingredients, forming a delicious base for the dessert. The bittersweet chocolate flavor of the cookies beautifully complements the sweetness of the pumpkin and cream cheese, creating a balanced and harmonious treat.
Cream Cheese: Achieving Creamy Perfection
The addition of cream cheese is vital in this recipe, as it contributes to the rich, creamy texture of the filling. Cream cheese not only adds a delightful tanginess that pairs well with the sweetness of the pumpkin but also helps to bind the mixture together, ensuring that each bite is smooth and decadent.
Using softened cream cheese is crucial to achieving the right consistency. If the cream cheese is too cold, it will not blend easily with the other ingredients, resulting in a lumpy filling. Make sure to allow the cream cheese to come to room temperature before mixing to ensure a silky-smooth texture.
Canned Pumpkin Puree: The Star Ingredient
When it comes to making Pumpkin Oreo Balls, using canned pumpkin puree is not only convenient but also beneficial. Canned pumpkin is readily available, saves time, and is a consistent source of flavor. It contains essential nutrients, such as vitamins A and C, and adds moisture to the filling, enhancing the overall taste of the dessert.
Opting for pure pumpkin puree rather than pumpkin pie filling is recommended, as the latter often contains added sugars and spices that could alter the flavor profile of your Oreo balls. Pure pumpkin allows you to control the sweetness and spice levels to your liking.
Spices: The Essence of Fall
No pumpkin recipe is complete without the warm and inviting spices that evoke the essence of fall. Pumpkin pie spice is a blend of cinnamon, nutmeg, ginger, and cloves, perfectly capturing the flavors associated with pumpkin desserts. A sprinkle of this spice into the filling enhances the pumpkin flavor and adds a delightful warmth that makes these Oreo balls feel comforting and seasonal.
In addition to pumpkin pie spice, a dash of vanilla extract can elevate the flavor profile further. Vanilla adds a fragrant sweetness that complements the other ingredients, enhancing the overall taste experience.
White Chocolate: The Perfect Coating
To create a luscious outer layer for your Pumpkin Oreo Balls, white chocolate is the ideal choice. Its creamy texture and sweet flavor contrast beautifully with the rich filling, providing a decadent finish to each bite. Additionally, white chocolate melts smoothly, making it easy to coat the Oreo balls evenly.
When selecting white chocolate for melting, look for high-quality chocolate bars or chips that contain cocoa butter. Avoid using chocolate-flavored coating or candy melts, as these may not provide the same rich flavor and smooth texture.
Optional Toppings: Enhancing Flavor and Presentation
While the Pumpkin Oreo Balls are delicious on their own, adding toppings can elevate both the flavor and presentation. Consider rolling the coated balls in crushed nuts, sprinkles, or additional crushed Oreos for an extra crunch. Drizzling melted chocolate, caramel, or even a sprinkle of sea salt can also add a unique twist that enhances the overall experience.
These optional toppings not only add visual appeal but also provide an opportunity to customize your Pumpkin Oreo Balls to suit your preferences and occasion.
Preparation Process
Now that you have a better understanding of the ingredients, it’s time to dive into the preparation process. Making Pumpkin Oreo Balls is straightforward and requires just a few simple steps. Here’s how to get started:
Crushing the Oreos: Techniques for the Perfect Texture
The first step in creating your Pumpkin Oreo Balls is to crush the Oreo cookies. To achieve the perfect texture for the base, you have a couple of options:
1. Food Processor Method: The most efficient way to crush Oreos is by using a food processor. Simply place the whole cookies (including the filling) into the processor and pulse until you achieve a fine crumb. This method ensures even consistency and saves time.
2. Ziplock Bag Method: If you don’t have a food processor, you can use a ziplock bag and a rolling pin. Place the Oreos in the bag, seal it tightly, and then crush them using the rolling pin until you reach a fine crumb texture. This method may take a bit longer but is equally effective.
Regardless of the method you choose, ensure that the Oreo crumbs are fine and uniform. Larger chunks may not bind well with the filling, affecting the overall texture of your Pumpkin Oreo Balls.
Mixing the Filling: Achieving the Right Consistency and Flavor Balance
Once your Oreos are crushed, it’s time to prepare the filling. In a mixing bowl, combine the crushed Oreos with softened cream cheese and pumpkin puree. Using a hand mixer or a spatula, blend the ingredients until they are well incorporated and smooth. You want the mixture to be creamy yet firm enough to hold its shape when rolled into balls.
Next, add in the pumpkin pie spice and vanilla extract. Start with a small amount of pumpkin pie spice and gradually increase it according to your taste preference. Mixing in the spices not only enhances the flavor but also fills your kitchen with a wonderful aroma reminiscent of autumn.
If the mixture feels too soft, you can adjust the consistency by adding a little more crushed Oreo crumbs. Aim for a texture that allows you to easily roll the mixture into balls without it falling apart.
Once the filling is well-mixed and flavored to your liking, it’s time to move on to the next steps of rolling and coating your Pumpkin Oreo Balls, which we will cover in the next part of this article.
As you embark on this delicious journey of creating Pumpkin Oreo Balls, you’ll find that the combination of flavors and textures in this recipe is not only easy to achieve but also incredibly rewarding. Your friends and family will surely appreciate the effort you put into these delightful treats, making them a cherished addition to your autumn festivities. Stay tuned for the continuation, where we will guide you through the rolling, coating, and finishing touches that will make your Pumpkin Oreo Balls truly irresistible.
Shaping the Balls: Tips for Uniform Size and Shape
To achieve the perfect Pumpkin Oreo Balls, uniform size and shape are crucial. This not only ensures even coating but also results in a visually appealing presentation. Here are some tips to help you shape the balls consistently:
1. Use a Cookie Scoop: Investing in a cookie scoop can save you time and ensure uniformity. A scoop typically holds about one tablespoon of mixture, which is perfect for this recipe. If you don’t have one, you can use your hands; just make sure to measure out equal portions.
2. Chill the Mixture: After mixing the cream cheese, crushed Oreos, and pumpkin puree, allow the mixture to chill in the refrigerator for about 30 minutes. Chilling makes the mixture firmer and easier to handle, preventing it from sticking to your hands.
3. Wet Your Hands: To avoid sticky fingers, lightly wet your hands with water before rolling the mixture into balls. This will prevent the dough from adhering to your skin, allowing for smoother ball formation.
4. Roll and Flatten: If you prefer, you can flatten the balls slightly for a more disc-like shape. This variation can provide a different texture and make coating easier.
5. Even Spacing: As you place the shaped balls on the baking sheet, ensure they are spaced evenly. This not only aids in the coating process but also allows for ease of storage later on.
Melting the Chocolate: Techniques to Ensure a Smooth Coating
Melting chocolate can be tricky, but with the right techniques, you can achieve a smooth, glossy coating for your Pumpkin Oreo Balls. Here’s how to do it effectively:
1. Choose the Right Chocolate: Opt for high-quality chocolate, whether it’s white, milk, or dark. Chocolate melts better and yields a smoother finish. For a sweeter taste, white chocolate is a popular choice, especially when paired with pumpkin flavors.
2. Use a Double Boiler: The best method for melting chocolate is using a double boiler. Fill a saucepan with a couple of inches of water and bring it to a simmer. Place a heatproof bowl on top, ensuring it doesn’t touch the water. Add your chocolate to the bowl and stir continuously until melted. This gentle heat prevents the chocolate from burning.
3. Microwave Method: If you prefer a quicker method, you can melt chocolate in the microwave. Place the chocolate in a microwave-safe bowl and heat in 30-second intervals, stirring in between to ensure even melting. Be careful not to overheat, as chocolate can seize up if burned.
4. Add Coconut Oil: For a smoother consistency, you can add a teaspoon of coconut oil or vegetable shortening to the melted chocolate. This will help thin the chocolate slightly, making it easier to coat the balls smoothly.
Coating the Balls: The Art of Dipping and Decorating
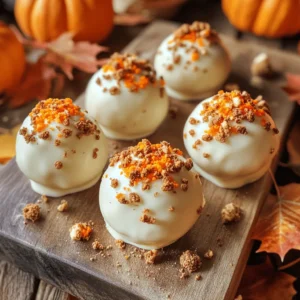
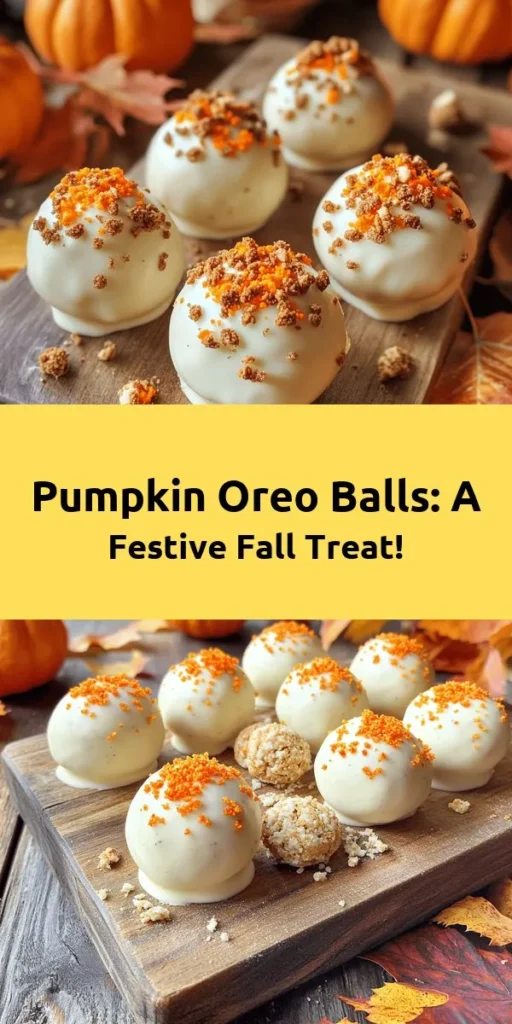
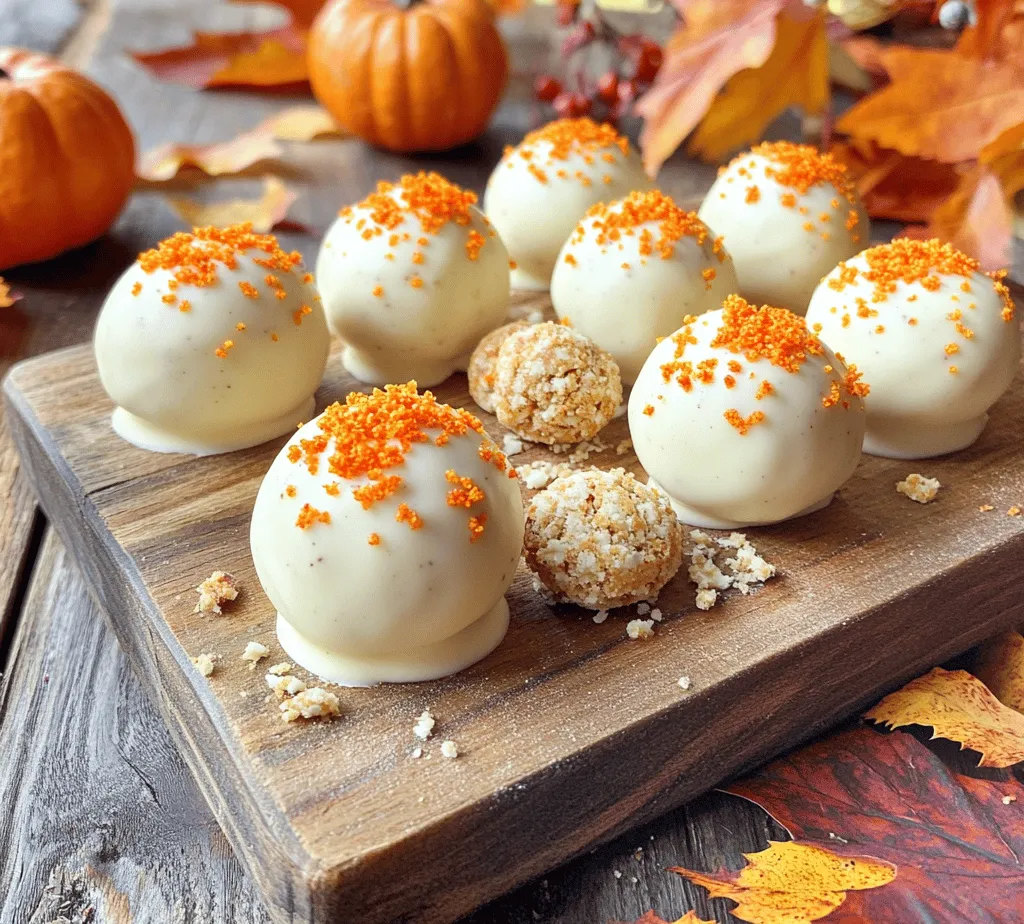
Once the Pumpkin Oreo Balls are shaped and the chocolate is melted, it’s time for the fun part: coating and decorating! Here’s how to do it right:
1. Dipping Tools: Use a fork or a dipping tool to help you coat the balls. If you’re using a fork, allow the ball to sit for a moment on the fork after dipping, letting excess chocolate drip off.
2. Coat Evenly: Ensure the ball is completely submerged in the melted chocolate; a thorough coating helps seal in the flavors and creates a delicious outer shell. Gently shake the fork to help any excess chocolate fall away.
3. Decorate: Before the chocolate sets, you can decorate the balls with sprinkles, crushed Oreos, or even a drizzle of contrasting chocolate. This adds a festive touch and enhances their visual appeal.
4. Cooling Rack: After coating, place the Pumpkin Oreo Balls on a cooling rack to set. This prevents them from sticking to a surface and allows air to circulate around them for even cooling.
Chilling: Importance of Setting Time for Optimal Texture
Chilling your coated Pumpkin Oreo Balls is an essential step that should not be skipped. Here’s why it matters:
1. Firming Up: Allow the coated balls to chill in the refrigerator for at least 30 minutes. This time helps the chocolate to harden and ensures the filling stays intact. The result is a delightful contrast between the creamy center and the crisp chocolate exterior.
2. Flavor Development: Chilling also allows the flavors to meld together, enhancing the overall taste. The pumpkin and cream cheese mixture develops a richer flavor, making each bite even more satisfying.
3. Improved Texture: Chilling helps achieve a pleasant texture. The balls will be firm yet creamy, creating a decadent treat that’s easy to bite into without falling apart.
Serving Suggestions
Now that your Pumpkin Oreo Balls are ready, it’s time to think about how to present these delightful treats during your gatherings. Here are some creative serving suggestions:
1. Festive Platter: Arrange the Pumpkin Oreo Balls on a decorative platter sprinkled with fall-themed decorations, such as mini pumpkins or autumn leaves. This not only enhances the visual appeal but also sets the mood for your gathering.
2. Individual Treat Bags: For a fun party favor, package the balls in small treat bags tied with twine or ribbon. This makes it easy for guests to take them home and enjoy later.
3. Pairing with Beverages: These treats pair wonderfully with a variety of beverages. Consider serving them with spiced apple cider, pumpkin spice lattes, or even a rich hot chocolate for a cozy dessert experience.
4. Alongside Other Treats: Create a dessert spread by pairing your Pumpkin Oreo Balls with other autumn-inspired treats, such as caramel apples, pecan pie bars, or a pumpkin cheesecake. This offers guests a variety of flavors and textures to enjoy.
Storing Leftovers: Best Practices to Maintain Freshness
If you happen to have any Pumpkin Oreo Balls left over, proper storage is key to maintaining their freshness. Here are some best practices:
1. Refrigeration: Store the balls in an airtight container in the refrigerator. This keeps them fresh and prevents them from drying out. They should last for about a week, although they may not last that long!
2. Freezing: You can also freeze the Pumpkin Oreo Balls if you want to save them for later. Place them in a single layer on a baking sheet to freeze individually before transferring them to an airtight container. This way, they won’t stick together and can be enjoyed at any time.
3. Thawing: When you’re ready to enjoy frozen balls, simply transfer them to the refrigerator to thaw for a few hours before serving. Avoid thawing them in the microwave, as this can cause the chocolate to become soft and lose its texture.
Nutritional Information
Understanding the nutritional information can help you enjoy your Pumpkin Oreo Balls mindfully. Here’s a breakdown of calories and nutritional value per serving:
1. Calories: Each Pumpkin Oreo Ball contains approximately 100-120 calories, depending on the size and the chocolate used. This makes them a delightful indulgence but also a treat to enjoy in moderation.
2. Nutritional Breakdown: In addition to calories, these treats provide a mix of carbohydrates, fats, and protein. Each ball contains about 6 grams of fat, 10 grams of carbohydrates, and 1 gram of protein. The presence of pumpkin puree adds a small amount of fiber and vitamins, enhancing their nutritional profile.
3. Dietary Considerations: For those with dietary restrictions, there are easy modifications. You can use gluten-free Oreo cookies for a gluten-free version or swap the cream cheese for a dairy-free alternative if you’re looking for a dairy-free option.
4. Balance Between Indulgence and Moderation: While Pumpkin Oreo Balls are a delightful indulgence, enjoying them in moderation can help balance your diet. They’re perfect for special occasions or as a treat during the fall season.
Conclusion
Pumpkin Oreo Balls Delight is more than just a recipe; it’s a celebration of the flavors of fall. With their creamy filling and sweet coating, these treats are bound to become a favorite in your household. Whether you’re preparing them for a festive occasion or simply to enjoy during a cozy night in, their easy preparation and delightful taste make them a must-try. Embrace the season and indulge in the joy of creating and sharing these delightful bites!